Tuesday, June 8, 2010

How to Create Reports in SharePoint from SharePoint Lists.

This blog explains how to integrate SQL Reporting Services with SharePoint.
The PreBuild Microsoft's Reporting Services WebPart is used to be configured to display SQL Reports which is to be fetch data from SQL Reporting Services.
It’s necessary to create reports in SharePoint Web Applicatons for Dashboards or printing information. So I have posted this blog to show step by step process to create Reports in SharePoint.

Architecture of SSRS Implementation on SharePoint


Contents:
  1. Configure Report Server.
  2. Start Reporting Server
  3. Create Visual Studio Project
  4. Create DataSource
  5. Create Report
  6. Get List GUID
  7. Deploy Reports
  8. Install Reporting WebPart
  9. Connect WebParts
1. Configure Report Server.


Go To: Start > All Programes > Microsoft SQL Server 2005 > Configuration Tools > Reporting Services Configuration
 
Check All OK. Remember
1. Report Server Virtual Directory Settings (ReportServer$MSSQL)
2. Report ManagerVirtual Directory Settings (Reports$MSSQL)


2.Start Reporting Server


1.Open IIS.
2. Do following..
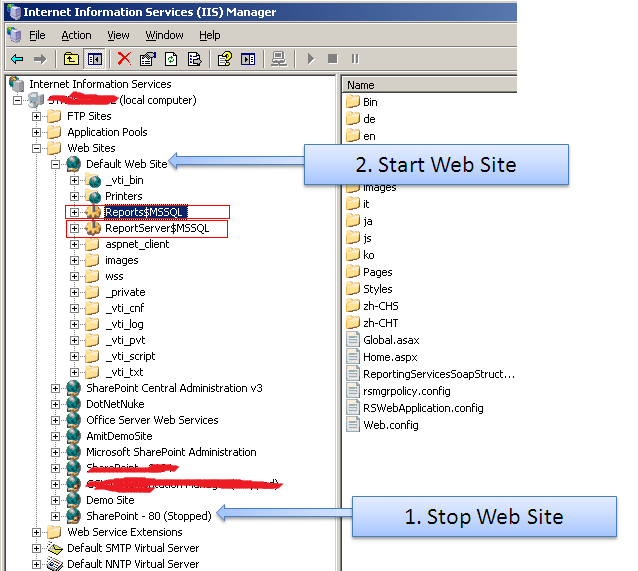
3. Start "Default Web Site".
4. Browse “ Reports$MSSQL”  to check Report Server is running…

3.Create New Visual Studio Project

1. Create New Project


4. Create DataSource


1. Right Click on "Shared Data Sources" folder and select  "Add New Data Source" [Popup will open]


2. Rename Shared Data Source Name to "SharePointWebServiceDataSource".
3. Select Type as "XML".
4. Put Connection String as "  http://ABCD1234:1000/_vti_bin/lists.asmx  "
5. If you have Credentials then provide in Credentials Tab.
6.Click on "OK"  if all complete.
5. To Know more about SharePoint Web Services - Click Here.

5. Get List GUID

1. You need a SharePoint List GUID for creating Reports.So following is a process to get List GUID.
2. You need to download " Stramit SharePoint Caml Viewer " from CodePlex Created by Renaud Comte (MVP).
3. Enter url as " http://ABCD1234:1000 " or  " http://ABCD1234:1000/SubSiteName ".
4. Enter Login Name and Password .
5. And Click on " >>Go<< " Button. Web Application Lists will be populated in List name select box.
6. Select required list.(eg: EmployeesInformation).
7. Copy List GUID.


6. Create  Reports

1. Right Click on "Reports" folder and select  "Add New Report" [Report wizard will open]

2.Select Shared Data Source Name as "SharePointWebServiceDataSource" and click on Next Button.

3. Insert Query String as Follows and Click on Next Button.
To know more about Query string Click Here.
<Query>
<Method Namespace="http://schemas.microsoft.com/sharepoint/soap/" Name="GetListItems">
<Parameters>
<Parameter Name="listName">
<DefaultValue>{EBF0634768DA-0C74-42B8-B76C-5348236158B6D9}</DefaultValue>
</Parameter>
</Parameters>
</Method>
<SoapAction>http://schemas.microsoft.com/sharepoint/soap/GetListItems</SoapAction>
</Query>
 

  * Red Text indicated List GUID.
4. Select report type as Tabular and click on Next Button.
5. Design Report as per requirements or you can modify it later.and click on Next Button.


6. Finally select Report Style and Rename Report with meaningful name. and click in Finish Button.


7. Deploy Reports

1. Go to Project Properties >>>
2. Give TargetDataSourceFolder as "  SharePoint Data Sources ".
3. Give TargetReportFolder as " SharePoint Reports ".
4. Give TargetServerURL as " http://localhost/ReportServer$MSSQL ".
5. And Click on OK Button.
6. Right click on Project  and click on " Deploy ".
7. Reports and Data Sources are automatically copied on Report Server.
8. Install Reporting WebPart on SharePoint Web Application

1. Download RSWebParts.cab.
2. Execute the following commands in shell to install RSWebPart  to SharePoint sites.
    stsadm.exe -o addwppack -force -filename "C:\SharePoint\RSWebParts.cab"
3. In the Add Web Parts Tool Pane, The Web Parts appear in the Web Part List as Report Viewer. Drag and drop Web Part onto the page in the desired locations.
4. On the Report Viewer Web Part menu, click Modify Shared Web Part.
5. In the Report Viewer Tool Pane, in the Configuration section, enter your Report Manager URL. This value is set to "  http://localhost/Reports$MSSQL " by default.
6. Set Rport Path As " /SharePoint Reports/AllEmpInformation "  and click on ok.


9. Connect WebParts

To be Continue...........

SharePoint Reporting

SharePoint Reporting ....

Reference 1

Wednesday, June 2, 2010

How to View Detail Error Message in SharePoint

Many times when we do SharePoint Custom programming ,Boom happen's "An unexpected error occurred".

So how to know the exact cause of error.........
You have to modify your web application Web.Config file as follows...

1. CallStack=”false” changed to CallStack=”true”

2. <customErrors mode=”On” /> changed to <customErrors mode=”Off” />

Go ahead.............

Wednesday, May 26, 2010

How to attach,delete,upload files to SharePoint List Item using Object Model

Snippet code of deleting attachment from SharePoint list item : private void DeleteAttachment(int NodeID, String strFileName)
{
SPContext.Current.Web.AllowUnsafeUpdates = true;
SPListItem delItem = lstAudit.GetItemById(NodeID);
SPAttachmentCollection atCol = delItem.Attachments;
foreach (string strDelfileName in atCol)
{
if (strDelfileName == strFileName)
{
atCol.Delete(strDelfileName);
delItem.Update();
lstAudit.Update();
return;
}}}

Snippet code for downloading attachment from SharePoint List Item :

private void DownloadAttachment(string FileName)

{

try

{

string AttachmentURL = string.Empty;

AttachmentURL = FileName;

string strName = AttachmentURL.Substring(AttachmentURL.LastIndexOf(“/”) + 1);

string sbURL = AttachmentURL.Trim();

System.Web.HttpContext.Current.Response.ContentEncoding = System.Text.Encoding.Default;

Response.AppendHeader(“Content-disposition”, “attachment; filename=” + strName);

Response.AppendHeader(“Pragma”, “cache”);

Response.AppendHeader(“Cache-control”, “private”);

Response.WriteFile(sbURL);

Response.End();

}

catch (Exception eDwn)

{

Response.Write(eDwn.Message);

}

}


Snippet code of uploading document to SharePoint List Item :


protected void btnUpload_Click(object sender, EventArgs e)

{

try

{

string fileName = “”;

string strExtensionName = “”;


fileName = System.IO.Path.GetFileName(FileUpload.PostedFile.FileName);


if (fileName != “”)

{

strExtensionName = fileName.Substring(fileName.IndexOf(“.”) + 1);

if (strExtensionName.Equals(“webpart”)

strExtensionName.Equals(“dll”)

strExtensionName.Equals(“bat”)

strExtensionName.Equals(“exe”))

{

lblMessage.Visible = true;

lblMessage.Text = “Invalid fileName!!”;

}

else

{

string _fileTime = DateTime.Now.ToFileTime().ToString();


string _fileorgPath = System.IO.Path.GetFullPath(FileUpload.PostedFile.FileName);


if (txtFileName.Text.Trim().Length > 0)

{

fileName = fileName.Replace(fileName.Substring(fileName.LastIndexOf(“\\”) + 1), txtFileName.Text) + “.” + strExtensionName;

}

string _newfilePath = _fileTime + “~” + fileName;


string tempFolder = Environment.GetEnvironmentVariable(“TEMP”);


string _filepath = tempFolder + _newfilePath;


FileUpload.PostedFile.SaveAs(_filepath);


AddRow(fileName, _filepath, 0, true);

}

}

else

{


lblMessage.Visible = true;

lblMessage.Text = “Please Selct file Name”;


}


}

catch (Exception Ex)

{

Response.Write(Ex.Message);

}


}


protected void dgdUpload_RowDeleting(object sender, GridViewDeleteEventArgs e)

{

int recordToDelete = e.RowIndex;


//dt = (DataTable)Page.Session["Files"];

dt = (DataTable)ViewState["Files"];


int cn = dt.Rows.Count;


if (Convert.ToInt32(dt.Rows[recordToDelete].ItemArray[0]) != 0)

{

DeleteAttachment(Convert.ToInt32(dt.Rows[recordToDelete].ItemArray[0]), dt.Rows[recordToDelete].ItemArray[1].ToString());

}


dt.Rows.RemoveAt(recordToDelete);


dt.AcceptChanges();

//Page.Session["Files"] = dt;

ViewState["Files"] = dt;

dgdUpload.DataSource = dt;

dgdUpload.DataBind();

}

private void AddMoreColumns()

{


dt = new DataTable(“Files”);


dc = new DataColumn(“ID”, Type.GetType(“System.Int16″));

dt.Columns.Add(dc);


dc = new DataColumn(“FileName”, Type.GetType(“System.String”));

dt.Columns.Add(dc);


dc = new DataColumn(“FilePath”, Type.GetType(“System.String”));

dt.Columns.Add(dc);


//Page.Session["Files"] = dt;

ViewState["Files"] = dt;


}

private void AddRow(string file, string path, int ID, Boolean bolCheckForfiles)

{


Boolean bolAddRow = true;

//dt = (DataTable)Page.Session["Files"];

dt = (DataTable)ViewState["Files"];


if (dt == null)

{

AddMoreColumns();


}

if (bolCheckForfiles)

{


if (dt.Rows.Count > 0)

{

foreach (DataRow drExistingrow in dt.Rows)

{


if (drExistingrow["FileName"].ToString() == file)

{

bolAddRow = false;

}

}

}

}

if (bolAddRow)

{


dr = dt.NewRow();


dr["ID"] = ID;

dr["FileName"] = file;

dr["FilePath"] = path;


dt.Rows.Add(dr);


//Page.Session["Files"] = dt;

ViewState["Files"] = dt;


dgdUpload.DataSource = dt;


dgdUpload.DataBind();//bind in grid


}

else

{

lblMessage.Visible = true;

lblMessage.Text = “Same File Name already exists!!!”;

}

}


protected void dgdUpload_RowCommand(object sender, GridViewCommandEventArgs e)

{

if (e.CommandName == “View”)

{

string file = e.CommandArgument.ToString();

DownloadAttachment(file);


}

}


if (dt != null)

{


int _dtcnt = dt.Rows.Count;

foreach (DataRow dr in dt.Rows)

{


Boolean bolAddAttachment = true;

fileName = dr["FileName"].ToString();

if (itmCorrectiveActionFinding.Attachments.Count > 0)

{

foreach (string strAttachedname in itmCorrectiveActionFinding.Attachments)

{


if (fileName == strAttachedname)

{

bolAddAttachment = false;


}

}

}

if (bolAddAttachment)

{

string strFilepath = dr["FilePath"].ToString();


StreamReader sr = new StreamReader(strFilepath);


Stream fStream = sr.BaseStream;


contents = new byte[fStream.Length];


fStream.Read(contents, 0, (int)fStream.Length);


fStream.Close();


itmCorrectiveActionFinding.Attachments.Add(fileName, contents);


itmCorrectiveActionFinding.Update();

lstCorrectiveActionFinding.Update();

SPContext.Current.Web.Update();

System.IO.File.Delete(strFilepath);


}

}

}

Wednesday, May 12, 2010

Introducing the SharePoint Object Model

As an alternative to programming against the SharePoint web services you can use the SharePoint object model. The object model can be used when the application will run on the server where SharePoint is installed (such as a console or WinForm application) or in assemblies that are run within a site (such as a Web Part or Web User Controls).

How to the SharePoint Object Model ?
First, you will need to create a reference to “SharePoint.dll” assembly in your Visual Studio 2005/2008 project. This is located at: C:\Program Files\Common Files\Microsoft Shared\Web Server Extensions\12\ISAPI\Microsoft.SharePoint.dll

1. Get Attachment Name                                                                                                                      
public string getAttachmentName(string ItemID)
{
string strDocName = "";
SPSite mySite = SPContext.Current.Site;
SPWeb myWeb = mySite.OpenWeb();
SPList List = myWeb.Lists["MyList"];
SPListItem splstItem = List.Items.GetItemById(Convert.ToInt32(ItemID));
if (splstItem.Attachments.Count > 0)
{
SPAttachmentCollection spColl = splstItem.Attachments;
strDocName = spColl[0];
}
return strDocName;
}
2. Get Items count from the list using SPQuery
public int GetItemsCount(string strStatus)
{
StringBuilder strQuery = new StringBuilder();
strQuery.Append("<Where>");
strQuery.Append("<Eq>");
strQuery.Append("<FieldRef Name='Status' />");
strQuery.Append("<Value Type='Choice'>" + strStatus+ "</Value>");
strQuery.Append("</Eq>");
strQuery.Append("</Where>");

SPSite mySite = SPContext.Current.Site;
SPWeb myWeb = mySite.OpenWeb();
SPList List = myWeb.Lists["MyList"];
SPQuery oSPQuery = new SPQuery();
oSPQuery.Query = strQuery.ToString();
SPListItemCollection items = List.GetItems(oSPQuery);
return items.Count;
}
3. Insert New Item in the list
SPSite mySite = SPContext.Current.Site;
SPWeb myWeb = mySite.OpenWeb();
SPList myList = myWeb.Lists["MyList"];
SPListItem item = myList.Items.Add();
item["Title"] = "Amit Phule";
item.Update();
4. Get List Items count
SPSite mySite = SPContext.Current.Site;
SPWeb myWeb = mySite.OpenWeb();
SPList List = myWeb.Lists["MyList"];
return List.Items.Count;
5. Update List Item from Item ID
SPSite mySite = SPContext.Current.Site;
SPWeb myWeb = mySite.OpenWeb();
SPList List = myWeb.Lists["DCCDocs"];
SPListItem oListItem = List.Items.GetItemById(Convert.ToInt32(ItemID));
oListItem["Title"] = "New Title";
oListItem.Update();
6. Delete List Item from Item ID
Code Here
7. Send Email from SharePoint
private void SendMail(string To, string Subject, string Body)
{
SPSite mySite = SPContext.Current.Site;
SPWeb oWeb = mySite.OpenWeb();
SPUtility.SendEmail(oWeb, true, true, To, Subject, Body);
}
8. Get List Item from CAML Query
StringBuilder strQuery = new StringBuilder();
strQuery.Append("<Where>");
strQuery.Append("<Eq>");
strQuery.Append("<FieldRef Name='Status' />");
strQuery.Append("<Value Type='Choice'>" + strStatus+ "</Value>");
strQuery.Append("</Eq>");
strQuery.Append("</Where>");
SPSite mySite = SPContext.Current.Site;
SPWeb myWeb = mySite.OpenWeb();
SPList List = myWeb.Lists["MyList"];
SPQuery oSPQuery = new SPQuery();
oSPQuery.Query = strQuery.ToString();
SPListItemCollection items = List.GetItems(oSPQuery);
foreach (SPItem item in items)
{
  TxtTitle.text=item["Title"].ToString();
}
9. Get User Groups
private Boolean IsCurrentUserGroup(string strGroupName)
{
Boolean isGroupPresent=false;
SPUser oCurrentUser = SPContext.Current.Web.CurrentUser;
foreach (SPGroup oSPGroup in oCurrentUser.Groups)
{
if (oSPGroup.Name.Equals(strGroupName))
isGroupPresent= true;
}
return isGroupPresent;
}
10. Title
Code Here


Monday, May 3, 2010

How to delete a timer job in SharePoint or Solution is always remain in Retracting state.

Problem : A deployment or retraction is already under way for the solution "xxx.wsp" , and only one deployment or retraction at a time is supported


Sometime this error has been occured from Windows SharePoint Services Administration command when the user do retractsolution or deploysolution like the follwing

C:\Program Files\Common Files\Microsoft Shared\web server extensions\12\BIN>stsadm -o retractsolution -name "%PackageName%" -local -url %TargetWebUrl%

or

C:\Program Files\Common Files\Microsoft Shared\web server extensions\12\BIN>stsadm -o deploysolution -name "%PackageName%" -local -allowGacDeployment -url %TargetWebUrl%

it occurs if anomalies deployment is running for the same package in the backend due to some previous deployment has been crashed before for some reason.

Solution:
To avoid this problem do the followings:

1. Look for the deploy jobId to break the running by the following command:

C:\Program Files\Common Files\Microsoft Shared\web server extensions\12\BIN>stsadm-o enumdeployments

2. Cancel the deploy typing the following command:

C:\Program Files\Common Files\Microsoft Shared\web server extensions\12\BIN>stsadm-o canceldeployment-id "GUID jobId"

3. Check that deploy has been canceled by typing the following command:

C:\Program Files\Common Files\Microsoft Shared\web server extensions\12\BIN>stsadm-o enumdeployments

Hope it should work.